Photoshop小技集その壱 ~ イラストからキャラだけを可能な限り早く楽に切り抜く
ども、デザイナーです。
今回はタイトル通り画像の切り抜きを紹介します。
はじめに
画像の切り抜きはデザイナー必須の技術ですが、1口に切り抜きと言っても本当に色んな方法がありますよね。
(僕個人は最終的なクオリティのことを考えるとペンツールなどで細かく範囲を選択するなどした方が良いと思ってます。 矩形もパスとして保存されるしね。)
今回ご紹介するのは細かいクオリティよりもスピードが重視される時に僕がよく使う切り抜きの方法です。

今回は上図のような画像からキャラクターの部分を切り抜きます。
1.レイヤーコピー
まずは今回使うツール!
自動選択ツールを使います。

このまま普通に背景のピンクの部分を自動選択ツールで選択すると図のようにキャラの周囲にある白いモヤの部分が邪魔して思うようにキャラだけを切り抜くことができません。

なのでまず、
レイヤーをコピーしましょう。(ショートカットキーCtrl + j)

2.画像に無茶な補正をかけてコントラストを強める
増えた方のレイヤーが選択されてることを確認してイメージ→色調補正→レベル補正でレベル補正ダイアログを開きます。
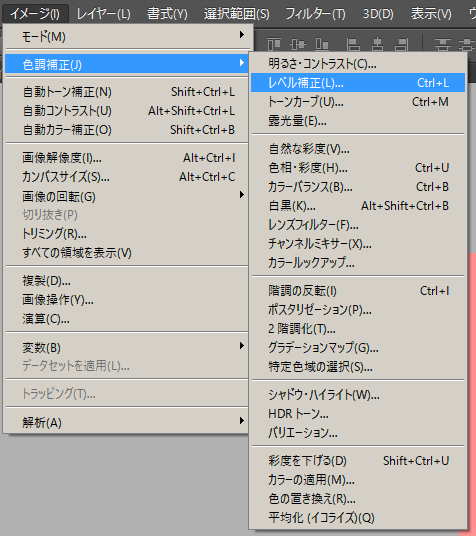
そんでもって、レベル補正ダイアログを操作し、めちゃくちゃコントラストを高めます。
設定は画像によって変わるので各自調節してください。
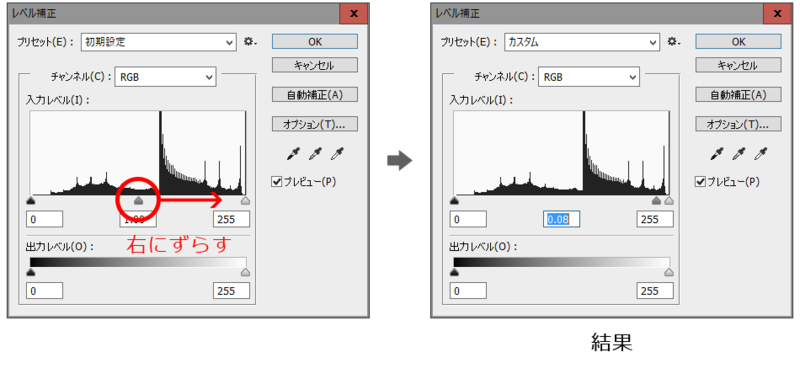
レベル補正を反映させた結果がこれです。

3.選択範囲をとってから元画像に戻って削除
ここで選択ツールを使用します。
 上図のような設定にしてから、赤くなった背景部分を選択します。
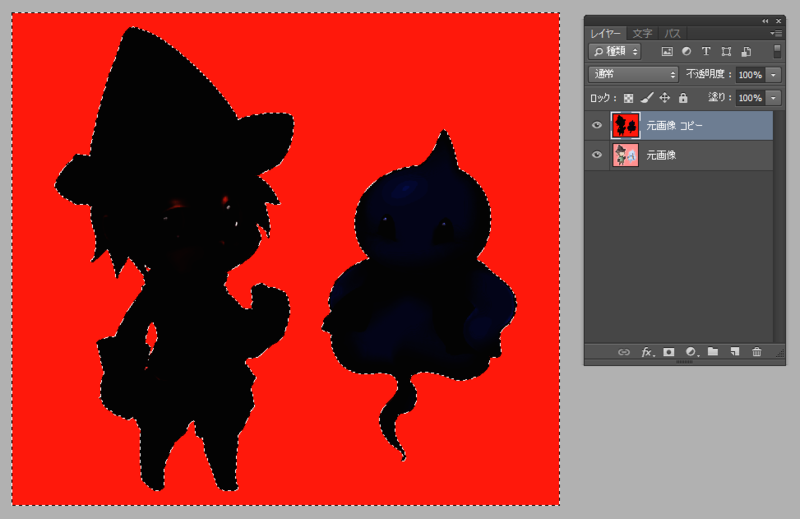
選択範囲が選択された状態で、元のレイヤーに戻りdeleteキーを押します。

4.コピーしたレイヤーの削除
仕上げにコピーしたレイヤーを削除して、完成!早いでしょ?
まとめ
まとめです。
1.レイヤーコピー
2.画像に無茶な補正をかけてコントラストを強める
3.選択範囲をとってから元画像に戻って削除
4.コピーしたレイヤーの削除
全く同じ手順で次のような写真も簡単に切り抜けます。
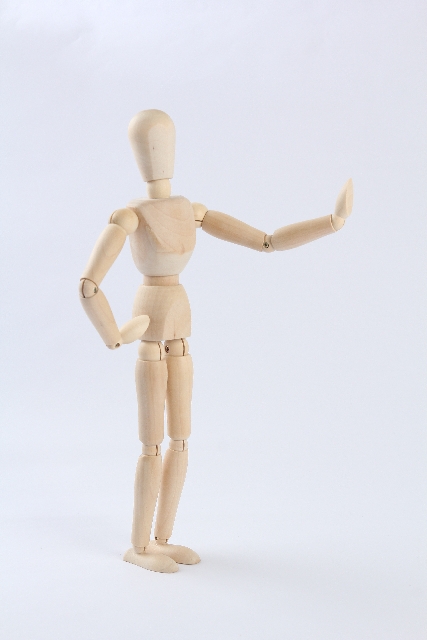
画像は以下から頂きました。

今回大事なのは選択範囲をとるためだけの新しいレイヤーをコピーして作る部分です。
選択範囲さえとったらコピーしたレイヤーは捨てるので使い捨てです。
こんな感じでレイヤーを操作すると色んな作業が一気に楽になります。
今回ご紹介した内容は、たくさんある手段の内のひとつですので飽くまで参考程度に見ていただけると幸いですん。んじゃまた!
【watchOS】Apple Watchで位置情報取得
Apple Watch seriese2から単体で位置情報を取得できるようになりました。
ということで、今回はApple Watchで位置情報を取得してみました。
コード
まずはコードをサクッと書いてみましょう プロジェクトを作成し、ターゲットを追加、WatchKit Appを選択しましょう。
そして追加されたInterfaceController.swiftを編集します。
import WatchKit
import Foundation
import CoreLocation

class InterfaceController: WKInterfaceController, CLLocationManagerDelegate {

    @IBOutlet var latitudeLabel: WKInterfaceLabel!      // InterfaceBuiderから追加
    @IBOutlet var longitudeLabel: WKInterfaceLabel!     // InterfaceBuiderから追加
    private var locationManager: CLLocationManager = CLLocationManager()
    private var currentLocation: CLLocation!

    override func willActivate() {
        super.willActivate()
        locationManager.desiredAccuracy = kCLLocationAccuracyBest
        locationManager.distanceFilter = 1000

        locationManager.delegate = self

        let status = CLLocationManager.authorizationStatus()
        if(status == CLAuthorizationStatus.notDetermined) {
            self.locationManager.requestWhenInUseAuthorization()
        }
        self.locationManager.startUpdatingLocation()
    }

    override func didDeactivate() {
        super.didDeactivate()
    }

    // MARK: - CLLocationManagerDelegate
    func locationManager(_ manager: CLLocationManager, didFailWithError error: Error) {

    }

    func locationManager(_ manager: CLLocationManager, didUpdateLocations locations:[CLLocation]) {

        let locationData = locations.last as CLLocation!
        self.currentLocation = locationData
        latitudeLabel.setText(String(self.currentLocation.coordinate.latitude))
        longitudeLabel.setText(String(self.currentLocation.coordinate.longitude))

        self.locationManager.stopUpdatingLocation()
    }

    private func locationManager(manager: CLLocationManager, didChangeAuthorizationStatus status:CLAuthorizationStatus) {
        if (status == .notDetermined) {

            if (self.locationManager.responds(to: #selector(CLLocationManager.requestWhenInUseAuthorization))) {
                self.locationManager.requestWhenInUseAuthorization()
            }
        }
    }
}
確認
AppleWatcとペアリングしているiPhoneを機内モードにし、AppleWatc単体で位置情報を取得できるか確認します。
iPhoneとの接続時と比べ、若干精度が落ちるようですが、無事に位置情報の取得が確認できました。
MapViewを追加すればWatch内でMapの表示もできるようです。
【C#】Windowsフォーム アプリケーションで動画再生ユーザコントロール
引き続きWindowsフォーム アプリケーション関連のメモです。
今回はWindowsフォーム アプリケーションでの動画再生についてです。一番簡単な方法はWindows Media Playerを利用することですが、あまりカスタマイズが出来ないため今回はDirectShowを使用します。
環境によってはActiveMovie control type libraryが参照できないときがあります。その場合、以下の方法を試してください。
1. レジストリエディタを起動し「HKEY_CLASSES_ROOT\TypeLib\{56A868B0-0AD4-11CE-B03A-0020AF0BA770}\1.0」を開く。
2. データの値が「quartz.dll」となっているのを確認して、「C:\Windows\System32\quartz.dll」の形式に変更。
3. Visual Studioで参照の追加を行い、ActiveMovie control type libraryを参照します。
namespace MoviePlayerSample
{
  partial class MoviePlayer
  {
    /// <summary>
    /// 必要なデザイナー変数です。
    /// </summary>
    private System.ComponentModel.IContainer components = null;

    /// <summary>
    /// 使用中のリソースをすべてクリーンアップします。
    /// </summary>
    /// <param name="disposing">マネージ リソースが破棄される場合 true、破棄されない場合は false です。</param>
    protected override void Dispose(bool disposing)
    {
      if (disposing && (components != null))
      {
        components.Dispose();
      }
      base.Dispose(disposing);
    }

    #region コンポーネント デザイナーで生成されたコード

    /// <summary>
    /// デザイナー サポートに必要なメソッドです。このメソッドの内容を
    /// コード エディターで変更しないでください。
    /// </summary>
    private void InitializeComponent()
    {
      this.picBackground = new System.Windows.Forms.PictureBox();
      ((System.ComponentModel.ISupportInitialize)(this.picBackground)).BeginInit();
      this.SuspendLayout();
      //
      // picBackground
      //
      this.picBackground.BackColor = System.Drawing.Color.MistyRose;
      this.picBackground.Dock = System.Windows.Forms.DockStyle.Fill;
      this.picBackground.Location = new System.Drawing.Point(0, 0);
      this.picBackground.Margin = new System.Windows.Forms.Padding(0);
      this.picBackground.Name = "picBackground";
      this.picBackground.Size = new System.Drawing.Size(431, 190);
      this.picBackground.TabIndex = 0;
      this.picBackground.TabStop = false;
      //
      // MoviePlayer
      //
      this.AutoScaleDimensions = new System.Drawing.SizeF(6F, 12F);
      this.AutoScaleMode = System.Windows.Forms.AutoScaleMode.Font;
      this.BackColor = System.Drawing.Color.OrangeRed;
      this.Controls.Add(this.picBackground);
      this.Margin = new System.Windows.Forms.Padding(0);
      this.Name = "MoviePlayer";
      this.Size = new System.Drawing.Size(431, 190);
      ((System.ComponentModel.ISupportInitialize)(this.picBackground)).EndInit();
      this.ResumeLayout(false);

    }

    #endregion

    private System.Windows.Forms.PictureBox picBackground;

  }
}
再生不可な動画を指定した場合、例外が発生しますのでエラー時の処理を追加することをお勧めします。後、Playメソッドで動画の拡張子チェックなども行うと良いでしょう。
またWndProcメソッドで動画再生の終了メッセージを補足したとき、ループ再生を行っています。そのまま停止させたい場合は改良してください。
早送り、巻き戻しには対応していません。
using QuartzTypeLib;
using System;
using System.ComponentModel;
using System.Drawing;
using System.Drawing.Drawing2D;
using System.IO;
using System.Runtime.InteropServices;
using System.Windows.Forms;

namespace MoviePlayerSample
{
  /// <summary>
  /// 動画再生ユーザコントロール
  /// </summary>
  public partial class MoviePlayer : UserControl
  {
    #region 定数
    /// 動画を子として描画する値を表す定数
    /// </summary>
    private const int WS_CHILD = 0x40000000;
    /// <summary>
    /// 子ウィンドウを互いに重ならないようにクリップする値を表す定数
    /// </summary>
    private const int WS_CLIPSIBLINGS = 0x04000000;
    /// <summary>
    /// すべてのデータのレンダリングをし終えた値を表す定数
    /// </summary>
    private const int EC_COMPLETE = 0x01;
    /// <summary>
    /// ユーザーが再生を強制終了した値を表す定数
    /// </summary>
    private const int EC_USERABORT = 0x02;
    /// <summary>
    /// アプリケーション定義のメッセージを定義する値を表す定数
    /// </summary>
    private const int WM_APP = 0x8000;
    /// <summary>
    /// フィルタグラフイベントのメッセージ取得に使用するIDを表す定数
    /// </summary>
    private const int WM_GRAPHNOTIFY = WM_APP + 1;
    #endregion

    #region メンバ変数
    /// <summary>
    /// フィルタグラフマネージャ
    /// </summary>
    private FilgraphManager _FilterGraph = null;
    /// <summary>
    /// メディアコントロールインターフェース
    /// </summary>
    private IMediaControl _MediaControl = null;
    /// <summary>
    /// ビデオウィンドウインターフェース
    /// </summary>
    private IVideoWindow _VideoWindow = null;
    /// <summary>
    /// メディアイベントインターフェース
    /// </summary>
    private IMediaEventEx _MediaEventEx = null;
    /// <summary>
    /// ベーシックビデオインターフェース
    /// </summary>
    private IBasicVideo _BasicVideo = null;
    /// <summary>
    /// ベーシックオーディオインターフェース
    /// </summary>
    private IBasicAudio _BasicAudio = null;
    /// <summary>
    /// メディアポジションインターフェース
    /// </summary>
    private IMediaPosition _MediaPosition = null;
    /// <summary>
    /// 再生を行う動画ファイルのパス
    /// </summary>
    private string _Source = String.Empty;
    #endregion

    #region プロパティ
    /// <summary>
    /// 再生する動画のファイルパスを取得または設定します。
    /// </summary>
    [Browsable(true)]
    [Category("動作")]
    [Description("再生する動画のファイルパスを取得または設定します。")]
    public string Source
    {
      get
      {
        return this._Source;
      }
      set
      {
        if (this._Source != value)
        {
          this._Source = value;
          Play();
        }
      }
    }

    /// <summary>
    /// 背景に画像を表示する場合のファイルパスを取得または設定します。
    /// </summary>
    [Browsable(true)]
    [Category("動作")]
    [Description("背景に画像を表示する場合のファイルパスを取得または設定します。")]
    public string Background
    {
      get
      {
        return this.picBackground.ImageLocation;
      }
      set
      {
        if (this.picBackground.ImageLocation != value)
        {
          this.picBackground.ImageLocation = value;
          ImageCorrection();
        }
      }
    }
    #endregion

    #region コンストラクタ
    /// <summary>
    /// クラスの新しいインスタンスを初期化します。
    /// </summary>
    public MoviePlayer()
    {
      InitializeComponent();
    }
    #endregion

    #region イベント
    /// <summary>
    /// ユーザコントロールがアンロードされたときに発生します。
    /// </summary>
    /// <param name="sender"></param>
    /// <param name="e"></param>
    private void OnUnload(object sender, EventArgs e)
    {
      // COMオブジェクトの初期化
      InitializeControl();
    }
    #endregion

    #region publicメソッド
    /// <summary>
    /// 動画を再生します。
    /// </summary>
    /// <param name="filePath"></param>
    public void Play()
    {
      // 再生する動画ファイルのパスが設定されていない場合、処理から抜ける
      if (String.IsNullOrEmpty(this._Source)) { return; }

      // 再生する動画ファイルが存在しない場合、処理から抜ける
      if (!File.Exists(this._Source)) { return; }

      PlayMovie();
    }

    /// <summary>
    /// 音量を上げます。
    /// </summary>
    public void VolumeUp()
    {
      if (this._BasicAudio != null && this._BasicAudio.Volume != 0)
      {
        this._BasicAudio.Volume += 100;
      }
    }

    /// <summary>
    /// 音量を下げます。
    /// </summary>
    public void VolumeDown()
    {
      if (this._BasicAudio != null && this._BasicAudio.Volume != -10000)
      {
        this._BasicAudio.Volume -= 100;
      }
    }

    /// <summary>
    /// 一時停止を解除します。
    /// </summary>
    public void Unpause()
    {
      if (this._MediaControl != null)
      {
        // グラフの一時停止を解除する
        this._MediaControl.Run();
      }
    }

    /// <summary>
    /// 動画の再生を一時停止します。
    /// </summary>
    public void Pause()
    {
      if (this._MediaControl != null)
      {
        // グラフを一時停止する
        this._MediaControl.Stop();
      }
    }
    #endregion

    #region protectedメソッド
    /// <summary>
    /// Load イベントを発生させます。
    /// </summary>
    /// <param name="e">イベントの引数</param>
    protected override void OnLoad(EventArgs e)
    {
      this.Disposed += OnUnload;

      base.OnLoad(e);
    }

    /// <summary>
    /// Resize イベントを発生させます。
    /// </summary>
    /// <param name="e">イベントの引数</param>
    protected override void OnResize(EventArgs e)
    {
      // 背景画像のサイズを変更します。
      ImageCorrection();

      if (this._VideoWindow == null) { return; }

      // 動画のサイズの取得
      var size = CalcDisplaySize();

      // 表示位置のオフセットを取得
      var point = CalcDisplayPoint(size);

      // VideWindowを動画のサイズに設定
      this._VideoWindow.SetWindowPosition(point.X, point.Y, size.X, size.Y);

      base.OnResize(e);
    }

    /// <summary>
    /// Windowsメッセージ処理のオーバーライド
    /// </summary>
    /// <param name="m"></param>
    protected override void WndProc(ref Message m)
    {
      int eventCode;
      int lparam1;
      int lparam2;

      if (m.Msg == WM_GRAPHNOTIFY)
      {
        // イベントをキューから取得する
        // while文でキューから全てのイベントを取得する
        while (true)
        {
          try
          {
            this._MediaEventEx.GetEvent(out eventCode, out lparam1, out lparam2, 0);
            this._MediaEventEx.FreeEventParams(eventCode, lparam1, lparam2);

            // ストリーム終了または中断
            if ((eventCode == EC_COMPLETE) || (eventCode == EC_USERABORT))
            {
              this._MediaPosition.CurrentPosition = 0;
              this._MediaControl.Run();
            }
          }
          catch (Exception)
          {
            break;
          }
        }
      }

      base.WndProc(ref m);
    }
    #endregion

    #region privateメソッド
    /// <summary>
    /// コントロールを初期化します。
    /// </summary>
    private void InitializeControl()
    {
      // 必要な場合は、動画の停止と画面の初期化
      if (this._MediaControl != null)
      {
        this._MediaControl.Stop();
      }

      if (this._MediaEventEx != null)
      {
        this._MediaEventEx.SetNotifyWindow(0, 0, 0);
      }

      if (this._VideoWindow != null)
      {
        this._VideoWindow.Visible = 0;
        this._VideoWindow.Owner = 0;
      }

      // 各COMオブジェクト(インターフェース)のRelease
      if (this._FilterGraph != null)
      {
        Marshal.ReleaseComObject(this._FilterGraph);
        this._FilterGraph = null;
      }

      if (this._BasicVideo != null)
      {
        Marshal.ReleaseComObject(this._BasicVideo);
        this._BasicVideo = null;
      }

      if (this._BasicAudio != null)
      {
        Marshal.ReleaseComObject(this._BasicAudio);
        this._BasicAudio = null;
      }

      if (this._MediaControl != null)
      {
        Marshal.ReleaseComObject(this._MediaControl);
        this._MediaControl = null;
      }

      if (this._MediaPosition != null)
      {
        Marshal.ReleaseComObject(this._MediaPosition);
        this._MediaPosition = null;
      }

      if (this._MediaEventEx != null)
      {
        Marshal.ReleaseComObject(this._MediaEventEx);
        this._MediaEventEx = null;
      }

      if (this._VideoWindow != null)
      {
        Marshal.ReleaseComObject(this._VideoWindow);
        this._VideoWindow = null;
      }
    }

    /// <summary>
    /// 動画を再生します。
    /// </summary>
    private void PlayMovie()
    {
      // COMオブジェクトの初期化
      if (this._MediaControl == null) { InitializeControl(); }

      try
      {
        if (this._MediaControl != null)
        {
          // 既にグラフが設定されていた場合、再生を行う
          this._MediaControl.Run();
          return;
        }

        // フィルタグラフマネージャを生成
        this._FilterGraph = new FilgraphManager();

        // 各インターフェースを取得
        this._BasicVideo = (IBasicVideo)this._FilterGraph;
        this._BasicAudio = (IBasicAudio)this._FilterGraph;
        this._MediaControl = (IMediaControl)this._FilterGraph;
        this._MediaEventEx = (IMediaEventEx)this._FilterGraph;
        this._VideoWindow = (IVideoWindow)this._FilterGraph;
        this._MediaPosition = (IMediaPosition)this._FilterGraph;

        // グラフを構築
        this._FilterGraph.RenderFile(this._Source);

        // VideoWindowをメインWindowにアタッチして、子ウィンドウに設定
        this._VideoWindow.Owner = (int)this.Handle;
        this._VideoWindow.WindowStyle = WS_CHILD | WS_CLIPSIBLINGS;

        // 動画のサイズの取得
        var size = CalcDisplaySize();

        // 表示位置のオフセットを取得
        var point = CalcDisplayPoint(size);

        // VideWindowを動画のサイズに設定
        this._VideoWindow.SetWindowPosition(point.X, point.Y, size.X, size.Y);

        // イベント通知を受け取るように所有者ウィンドウを設定
        this._MediaEventEx.SetNotifyWindow((int)this.Handle, WM_GRAPHNOTIFY, 0);

        // グラフを実行
        this._MediaControl.Run();
      }
      catch (Exception ex)
      {
        Console.WriteLine(ex.StackTrace);
        // COMオブジェクトの初期化
        InitializeControl();
      }
    }

    /// <summary>
    /// 引数のサイズからアスペクト比を算出します。
    /// </summary>
    /// <param name="w">横の解像度</param>
    /// <param name="h">縦の解像度</param>
    /// <returns>アスペクト比</returns>
    private Point CalcAspect(int w, int h)
    {
      // 最大公約数を求める
      var gcd = Gcd(w, h);

      var result = new Point();
      result.X = w / gcd;
      result.Y = h / gcd;
      return result;
    }

    /// <summary>
    /// 最大公約数を求めます。
    /// </summary>
    /// <param name="w">横の解像度</param>
    /// <param name="h">縦の解像度</param>
    /// <returns></returns>
    private int Gcd(int w, int h)
    {
      if (w < h)
      {
        return Gcd(h, w);
      }
      while (h != 0)
      {
        var remainder = w % h;
        w = h;
        h = remainder;
      }
      return w;
    }

    /// <summary>
    /// 表示する動画のサイズを算出します。
    /// </summary>
    /// <returns>動画のサイズ</returns>
    private Point CalcDisplaySize()
    {
      // コントロールのサイズ取得
      var dh = this.Height;
      var dw = this.Width;

      // 動画のサイズ取得
      var sh = 0;
      var sw = 0;
      this._BasicVideo.GetVideoSize(out sw, out sh);
      // アスペクト比を求める
      var aspect = CalcAspect(sw, sh);

      // 表示解像度
      var h = dh;
      var w = dw;

      // コントロールと動画の高さを比較し、大きい方を設定する
      // = 高さの解像度 / 高さの比率
      // = 比率*幅の比率

      // = 幅の解像度 / 幅の比率
      // = 比率*高さの比率

      // 高さを求める
      var ratio = ((double)h / (double)aspect.Y);
      var w1 = (int)(ratio * aspect.X);
      // 幅を求める
      ratio = ((double)w / (double)aspect.X);
      var h1 = (int)(ratio * aspect.Y);

      if (h1 < h)
      {
        h = h1;
      }
      if (w1 < w)
      {
        w = w1;
      }

      return new Point(w, h);
    }

    /// <summary>
    /// 動画を表示する位置を算出します。
    /// </summary>
    /// <returns>動画の表示位置</returns>
    private Point CalcDisplayPoint(Point size)
    {
      // コントロールのサイズ取得
      var h = this.Height;
      var w = this.Width;

      var x = 0;
      var y = 0;

      // 動画の幅とコントロールの幅を比較し動画のサイズが小さい場合、オフセット位置を算出する
      if (size.X < w)
      {
        x = (w - size.X) / 2;
      }
      // 動画の高さとコントロールの高さを比較し動画のサイズが小さい場合、オフセット位置を算出する
      if (size.Y < h)
      {
        y = (h - size.Y) / 2;
      }

      return new Point(x, y);
    }

    /// <summary>
    /// 画像を補間処理します。
    /// </summary>
    private void ImageCorrection()
    {
      if (String.IsNullOrEmpty(this.picBackground.ImageLocation)) { return; }

      using (var image = new Bitmap(this.picBackground.ImageLocation))
      {
        this.picBackground.Image = ResizeImage(image, this.picBackground.Width, this.picBackground.Height);
      }
    }

    /// <summary>
    /// 画像リサイズ
    /// </summary>
    /// <param name="image">画像</param>
    /// <param name="width">表示領域の幅</param>
    /// <param name="height">表示領域の高さ</param>
    /// <returns>リサイズを行ったビットマップ画像</returns>
    private Image ResizeImage(Image image, int width, int height)
    {
      // 画像のサイズを算出
      var w = image.Width;
      var h = image.Height;

      var s = System.Math.Min(width / w, height / h);
      var sW = (int)(s * w);
      var sH = (int)(s * h);

      // リサイズした画像を生成する
      var result = new Bitmap(width, height);
      using (var g = Graphics.FromImage(result))
      {
        g.InterpolationMode = InterpolationMode.HighQualityBicubic;
        g.DrawImage(image, (width - sW) / 2, (height - sH) / 2, sW, sH);
        g.Dispose();
      }

      return result;
    }
    #endregion
  }
}
Windowsのデフォルトだとコーデックがまったくインストールされていないため、WMVやAVIくらいしか再生できませんので、フリーのコーデックパックを使用すると良いでしょう。
【Xamarin】Youtube再生【Android】
XamarinでYoutubeをアプリ内で再生しないといけない場面があり、少し詰まったので自分のメモがてら記事にまとめてみました。
AndroidでYoutubeを再生するためにはいくつか手段がありますが、今回はYouTube Android Player APIを使用した再生方法を試しています。
YouTube Android Player APIの準備
XamarinでYouTube Android Player APIを使用する場合はBinding Java Libraryを使用します。
Xamarin公式リファレンス
1.YouTube Android Player API - DownloadよりYouTube Android Player APIのjarファイルをダウンロード
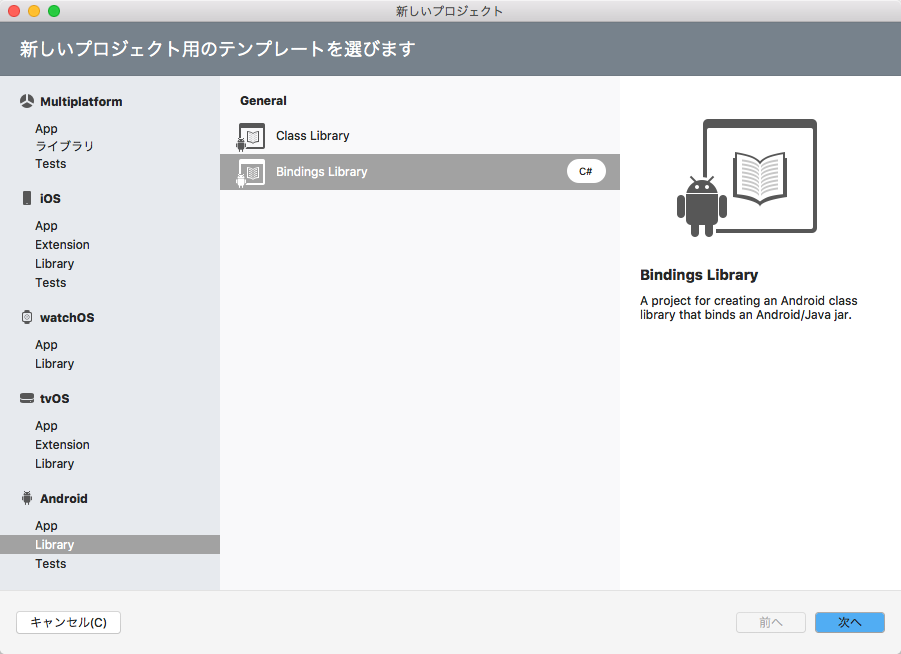
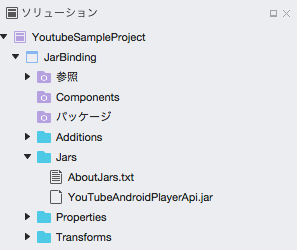
2.BindingsLibraryを作成して、ダウンロードしたjarファイルをJarsフォルダに入れる
(ビルドアクションはEmbeddedJarにする)
3./Transforms/Metadata.xmlを修正
<?xml version="1.0" encoding="UTF-8"?>
<metadata>
    <attr path="/api/package[@name='com.google.android.youtube.player']" name="managedName">Google.YouTube.Player</attr>
    <remove-node path="/api/package[@name='com.google.android.youtube.player']/class[@name='YouTubeThumbnailView']/method[@name='finalize' and count(parameter)=0]" />
</metadata>
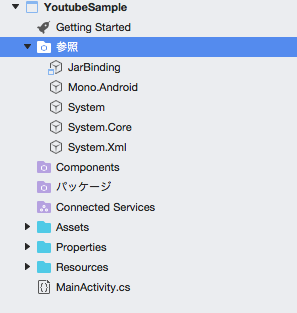
4.一度ビルドした後、実行したいプロジェクトでBindingsLibraryを参照に追加
Google Developers ConsoleでAPIキーを取得
1.GoogleDevelopersConsoleでYouTube Data API v3を有効にする
2.認証情報ページよりAPIキーを取得
パーミッションの設定
1.permissionでインターネット接続を許可
コード修正
1.Activityを修正します
using Android.App;
using Android.Widget;
using Android.OS;
using Google.YouTube.Player;

namespace YoutubeSample {
    [Activity(Label = "YoutubeSample", MainLauncher = true, Icon = "@mipmap/icon")]
    public class MainActivity : Activity,IYouTubePlayerOnInitializedListener {
        private static int RECOVERY_DIALOG_REQUEST = 1;
        private readonly string ApiKey = "";
        private readonly string VideoId = "";

        protected override void OnCreate(Bundle savedInstanceState) {
            base.OnCreate(savedInstanceState);
            SetContentView(Resource.Layout.Main);

            YouTubePlayerFragment youTubePlayerFragment = FragmentManager.FindFragmentById<YouTubePlayerFragment>(Resource.Id.youtube_fragment);
            youTubePlayerFragment.Initialize(ApiKey, this);
        }

        public virtual void OnInitializationSuccess(IYouTubePlayerProvider provider, IYouTubePlayer player, bool wasRestored) {
            if (!wasRestored) {
                player.CueVideo(VideoId);
            }
        }

        public void OnInitializationFailure(IYouTubePlayerProvider provider, YouTubeInitializationResult errorReason) {
            if (errorReason.IsUserRecoverableError) {
                errorReason.GetErrorDialog(this, RECOVERY_DIALOG_REQUEST).Show();
            } else {
                Toast.MakeText(this, errorReason.ToString(), ToastLength.Long).Show();
            }
        }
    }
}
2.レイアウトxmlを修正
<?xml version="1.0" encoding="utf-8"?>
<LinearLayout xmlns:android="http://schemas.android.com/apk/res/android"
    android:orientation="vertical"
    android:layout_width="match_parent"
    android:layout_height="match_parent">
    <fragment
        android:id="@+id/youtube_fragment"
        android:name="com.google.android.youtube.player.YouTubePlayerFragment"
        android:layout_width="match_parent"
        android:layout_height="match_parent" />
</LinearLayout>
実行画面
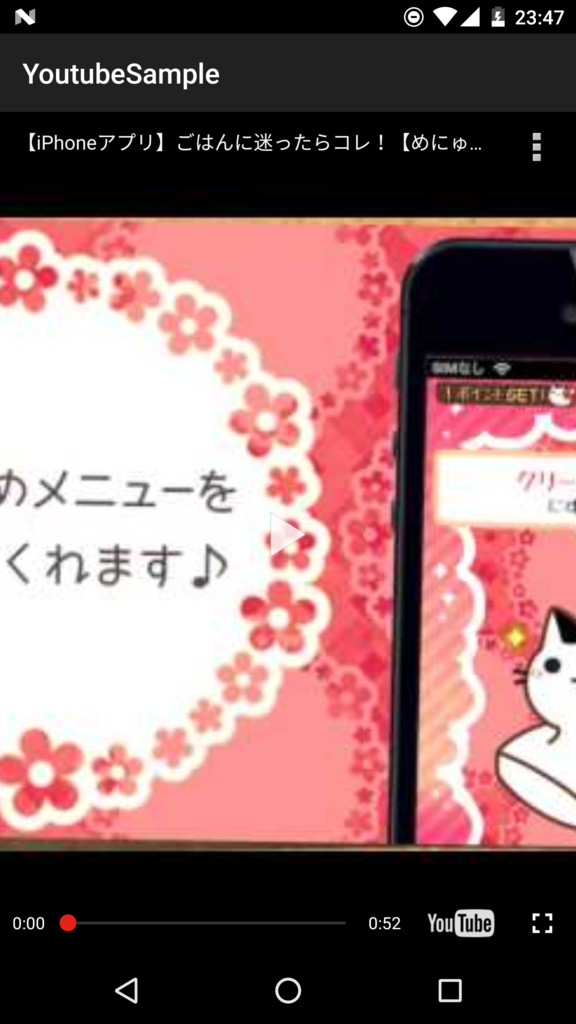
実行すると以下のような画面になり、youtubeが再生できることが確認できます。(実機推奨)
【Swift】watchOS 3 × Core Motion
【Swift】watchOS 3 × Core Motion
今回はApple Watch Series 2を購入しましたので早速遊んでみました。
WatchAppのつくりかた
watchAppは基本的にiOS向けアプリの拡張機能なので、Extensionで実装します。
Target->「+」->watchOS->Watch Kit Appと進んでいけばExtensionを追加できます。
ターゲットの追加が完了すると、ソースツリー内に「ターゲット名」、「ターゲット名 Extension」のフォルダが2つ作成されます。
今回触るのは「ターゲット名 Extension」内のInterfaceController.swiftです。
InterfaceControllerの編集
import CoreMotion

class InterfaceController: WKInterfaceController {
    let motionMng = CMMotionManager()
    let queue = OperationQueue()

    override func awake(withContext context: Any?) {
        super.awake(withContext: context)

        // モーションが取得できない
        if ! motionMng.isDeviceMotionAvailable {
            return
        }

        // 値の取得を開始
        motionMng.startDeviceMotionUpdates(to: queue) {
            deviceMotion, error in
            // エラー
            if error != nil {
                print("error: \(error!)")
            }
            // 値の取得に成功
            if deviceMotion != nil {
                print("姿勢角 = \(deviceMotion!.attitude)")
                print("重力加速度 = \(deviceMotion!.gravity)")
                print("回転率 = \(deviceMotion!.rotationRate)")
                print("デバイスの加速度 = \(deviceMotion!.userAcceleration)")
                print("-------------------------------------------")
            }
        }
    }


}
まとめ
今回は値の取得のみでしたが、この値を計算し、水平器やなど作れたら良いかなー 走ってるときと車移動などの判別はデバイスの加速度などを見て判断できるのではないでしょうか
【C#】ユーザコントロールでテロップ表示
今回もWindowsフォーム アプリケーション関連のメモです。
Windowsフォームアプリの要件の場合で、たまに出てくる文字列のテロップ表示を行うユーザコントロールを今回は作成したいと思います。
namespace TelopSample
{
  partial class TelopLabel
  {
    /// <summary>
    /// 必要なデザイナー変数です。
    /// </summary>
    private System.ComponentModel.IContainer components = null;

    /// <summary>
    /// 使用中のリソースをすべてクリーンアップします。
    /// </summary>
    /// <param name="disposing">マネージ リソースが破棄される場合 true、破棄されない場合は false です。</param>
    protected override void Dispose(bool disposing)
    {
      if (disposing && (components != null))
      {
        components.Dispose();
      }
      base.Dispose(disposing);
    }

    #region コンポーネント デザイナーで生成されたコード

    /// <summary>
    /// デザイナー サポートに必要なメソッドです。このメソッドの内容を
    /// コード エディターで変更しないでください。
    /// </summary>
    private void InitializeComponent()
    {
      this.pnlTelop = new System.Windows.Forms.Panel();
      this.SuspendLayout();
      //
      // pnlTelop
      //
      this.pnlTelop.Dock = System.Windows.Forms.DockStyle.Fill;
      this.pnlTelop.Location = new System.Drawing.Point(0, 0);
      this.pnlTelop.Margin = new System.Windows.Forms.Padding(0);
      this.pnlTelop.Name = "pnlTelop";
      this.pnlTelop.Size = new System.Drawing.Size(300, 50);
      this.pnlTelop.TabIndex = 0;
      //
      // TelopLabel
      //
      this.AutoScaleDimensions = new System.Drawing.SizeF(29F, 72F);
      this.AutoScaleMode = System.Windows.Forms.AutoScaleMode.Font;
      this.Controls.Add(this.pnlTelop);
      this.Margin = new System.Windows.Forms.Padding(0);
      this.Name = "TelopLabel";
      this.Size = new System.Drawing.Size(300, 50);
      this.Load += new System.EventHandler(this.TelopLabel_Load);
      this.ResumeLayout(false);

    }

    #endregion

    private System.Windows.Forms.Panel pnlTelop;

  }
}
ポイントは文字を動かすのではなく、ラベル自体をタイマーで移動させることです。
コントロールの幅と文字列を実際に描画した幅を算出、連結表示したい場合なども考慮し複数のラベルを生成します。生成したラベルの位置をタイマーでずらしながら表示しているだけです。
もっと軽くしたいのでしたら文字を自力レンダリングするのが良いでしょう。
using System;
using System.Collections.Generic;
using System.ComponentModel;
using System.Drawing;
using System.Windows.Forms;

namespace TelopSample
{
  /// <summary>
  /// テロップユーザコントロール
  /// </summary>
  public partial class TelopLabel : UserControl
  {
    #region メンバ変数
    /// <summary>
    /// テロップの実行を制御するタイマー
    /// </summary>
    private Timer _Timer;

    /// <summary>
    /// テロップ表示するテキスト
    /// </summary>
    private string _TelopText = String.Empty;

    /// <summary>
    /// テロップ表示するテキストの配置
    /// </summary>
    private ContentAlignment _TelopTextAlign = ContentAlignment.MiddleCenter;

    /// <summary>
    /// スクロールの実行可否
    /// </summary>
    private bool _DoScroll = false;

    /// <summary>
    /// 連結表示
    /// </summary>
    private bool _ConnectedDisplay = false;

    /// <summary>
    /// タイマーの間隔
    /// </summary>
    private int _Interval = 1;

    /// <summary>
    /// コントロールの表示間隔
    /// </summary>
    private int _NextControlIntervalWidth = 0;

    /// <summary>
    /// テロップ表示するラベルオブジェクトのコレクション
    /// </summary>
    private List<Label> _LabelCaptions;
    #endregion

    #region プロパティ
    /// <summary>
    /// テロップに表示する文字列を取得または設定します。
    /// </summary>
    [Browsable(true)]
    [Category("表示")]
    [Description("テロップに表示する文字列を取得または設定します。")]
    public string TelopText
    {
      get
      {
        return this._TelopText;
      }
      set
      {
        if (this._TelopText != value)
        {
          this._TelopText = value;
        }
      }
    }

    /// <summary>
    /// テロップに表示するテキストの配置を取得または設定します。
    /// </summary>
    [Browsable(true)]
    [Category("表示")]
    [Description("テロップに表示するテキストの配置を取得または設定します。")]
    public ContentAlignment TelopTextAlign
    {
      get
      {
        return this._TelopTextAlign;
      }
      set
      {
        if (this._TelopTextAlign != value)
        {
          this._TelopTextAlign = value;
        }
      }
    }

    /// <summary>
    /// テロップの実行可否を取得または設定します。
    /// </summary>
    [Browsable(true)]
    [Category("動作")]
    [Description("スクロールの実行可否を取得または設定します。")]
    public bool DoScroll
    {
      get
      {
        return this._DoScroll;
      }
      set
      {
        if (this._DoScroll != value)
        {
          this._DoScroll = value;
        }
      }
    }

    /// <summary>
    /// テロップする文字を連結表示するかを示す値を取得または設定します。
    /// </summary>
    [Browsable(true)]
    [Category("動作")]
    [Description("テロップする文字を連結表示するかを示す値を取得または設定します。")]
    public bool ConnectedDisplay
    {
      get
      {
        return this._ConnectedDisplay;
      }
      set
      {
        if (this._ConnectedDisplay != value)
        {
          this._ConnectedDisplay = value;
        }
      }
    }

    /// <summary>
    /// タイマーの間隔を取得または設定します。
    /// </summary>
    /// <remarks>ミリ秒で設定します。1ミリ秒がデフォルト値です。
    /// 早い:1ミリ秒、普通:25ミリ秒、遅い:50ミリ秒でToolからは設定を行う。
    /// </remarks>
    [Browsable(true)]
    [Category("動作")]
    [Description("タイマーの間隔を取得または設定します。")]
    public int Interval
    {
      get
      {
        return this._Interval;
      }
      set
      {
        if (this._Interval != value)
        {
          this._Interval = value;
        }
      }
    }
    #endregion

    #region コンストラクタ
    /// <summary>
    /// クラスの新しいインスタンスを初期化します。
    /// </summary>
    public TelopLabel()
    {
      InitializeComponent();
      this.DoubleBuffered = true;
    }
    #endregion

    #region イベント
    /// <summary>
    /// コントロールが初めて表示される前に発生します。
    /// </summary>
    /// <param name="sender">イベントの送り手</param>
    /// <param name="e">イベントの引数</param>
    private void TelopLabel_Load(object sender, EventArgs e)
    {
      InitializeControl();
    }

    /// <summary>
    /// 指定したタイマーの間隔が経過し、タイマーが有効である場合に発生します。
    /// </summary>
    /// <param name="sender">イベントの送り手</param>
    /// <param name="e">イベントの引数</param>
    private void TelopTimer_Tick(object sender, EventArgs e)
    {
      Animation();
    }
    #endregion

    #region override
    /// <summary>
    /// Resize イベントを発生させます。
    /// </summary>
    /// <param name="e">イベントの引数</param>
    protected override void OnResize(EventArgs e)
    {
      if (this._Timer != null) { this._Timer.Enabled = false; }

      InitializeControl();

      base.OnResize(e);
    }
    #endregion

    #region Privateメソッド
    /// <summary>
    /// コントロールを構築します。
    /// </summary>
    private void InitializeControl()
    {
      this.pnlTelop.BackColor = this.BackColor;

      // テロップ表示するラベルコントロールのコレクションを作成
      CreateLabelList();

      // スクロール開始
      if (this._DoScroll)
      {
        this._Timer = new Timer();
        this._Timer.Interval = this._Interval;
        this._Timer.Tick += new EventHandler(TelopTimer_Tick);
        this._Timer.Enabled = true;
      }
    }

    /// <summary>
    /// テキストとフォントサイズから適切なコントロールサイズを算出します。
    /// </summary>
    private Size CalcTelopLabelSize()
    {
      // 仮のキャンバスへ文字列を描画して、コントロールのサイズを算出する
      using (var canvas = new Bitmap(this.Width, this.Height))
      using (var g = Graphics.FromImage(canvas))
      {
        TextRenderer.DrawText(g, this._TelopText, this.Font, new Point(0, 0), Color.Black);
        // 文字列を描画するときの大きさを計測する
        var size = TextRenderer.MeasureText(g, this._TelopText, this.Font);

        return size;
      }
    }

    /// <summary>
    /// テロップ表示を行うためのラベルのコレクションを生成します。
    /// </summary>
    private void CreateLabelList()
    {
      this._LabelCaptions = new List<Label>();

      // ラベルコントロールのサイズ算出
      var size = CalcTelopLabelSize();

      if (size.Height <= 0 || size.Width <= 0) { return; }

      // ラベルとキャンバスのサイズからコントロールのコレクション数を算出する
      // 文字列のサイズより表示領域の幅が大きいときはラベルを複数生成して連結表示するようにコレクション数を求める
      // それ以外の場合、2固定で連結表示する
      var num = 2;
      if (this._ConnectedDisplay)
      {
        num = (int)(size.Width < this.Width ?
          System.Math.Ceiling((double)(this.Width + size.Width) / (double)size.Width) :
          System.Math.Ceiling((double)size.Width / (double)this.Width));
      }

      for (int i = 0; i < num; i++)
      {
        var control = new Label();
        control.AutoSize = false;
        control.Text = this._TelopText;
        control.TextAlign = this._TelopTextAlign;
        control.Font = this.Font;
        control.ForeColor = this.ForeColor;
        control.BackColor = Color.Transparent;
        control.Size = size;
        control.Height = this.pnlTelop.Height;
        control.Top = 0;
        control.Left = this.Width + (size.Width * i);
        control.Anchor = (AnchorStyles.Top | AnchorStyles.Bottom);
        control.BringToFront();
        this._LabelCaptions.Add(control);

        // 連結しない場合、一件のみ生成する
        if (!this._ConnectedDisplay) { break; }
      }
      this.pnlTelop.Controls.Clear();
      this.pnlTelop.Controls.AddRange(this._LabelCaptions.ToArray());

      // コントロールの表示間隔を求める
      if (this._ConnectedDisplay && this.Width < size.Width * this._LabelCaptions.Count)
      {
        this._NextControlIntervalWidth = size.Width * (this._LabelCaptions.Count - 1);
      }
      else
      {
        this._NextControlIntervalWidth = this.Width;
      }
    }

    /// <summary>
    /// テロップのアニメーションを行います。
    /// </summary>
    private void Animation()
    {
      var max = this._LabelCaptions.Count;

      for (int i = 0; i < max; i++)
      {
        this._LabelCaptions[i].Top = 0;
        this._LabelCaptions[i].Left = this._LabelCaptions[i].Left - 1 != -this._LabelCaptions[i].Width ?
          this._LabelCaptions[i].Left - 1 : this._NextControlIntervalWidth;
      }
    }
    #endregion
  }
}
今回は横移動のテロップを紹介しましたが、縦移動がしたい場合は1文字ごとにラベルを生成してポイントをずらすことで可能です。
遂に出た - Mac版Visual Studio
MicrosoftのイベントConnect(); // 2016で「Visual Studio for Mac」が発表されたので、早速入れてみました!
「Visual Studio for Mac」は「Xamarin Studio」をベースにしたもので、macOS、iOS、Android、サーバーアプリケーションの開発が可能みたいです。
ダウンロードはMicrosoftの公式サイトからできます。
Visual Studio for Mac
(iOSアプリを作成する場合は別途Xcodeが必要)
とりあえずダウンロードしてインストール。
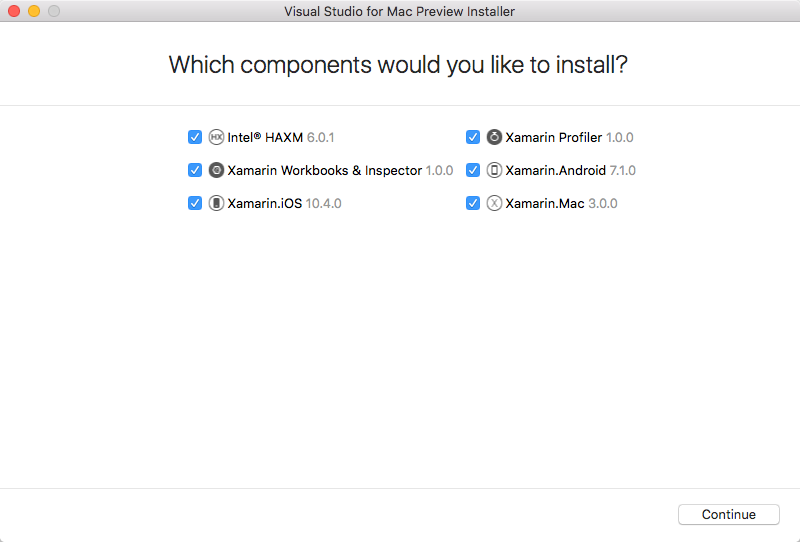
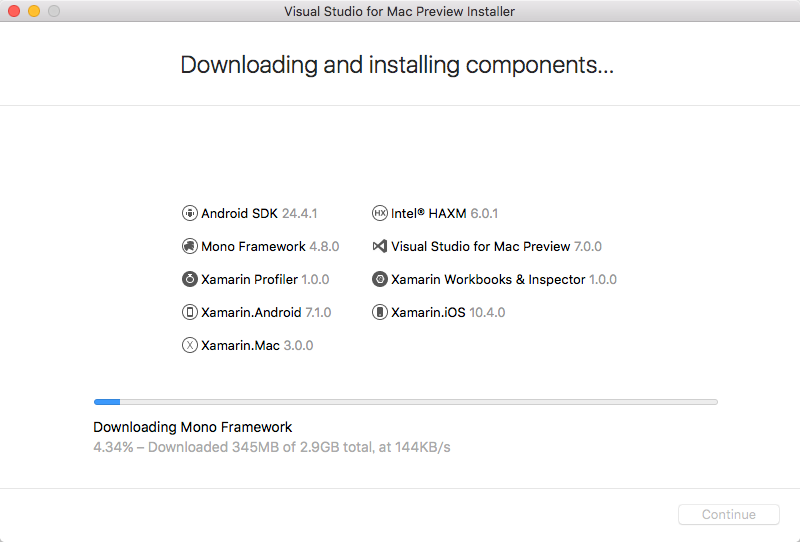
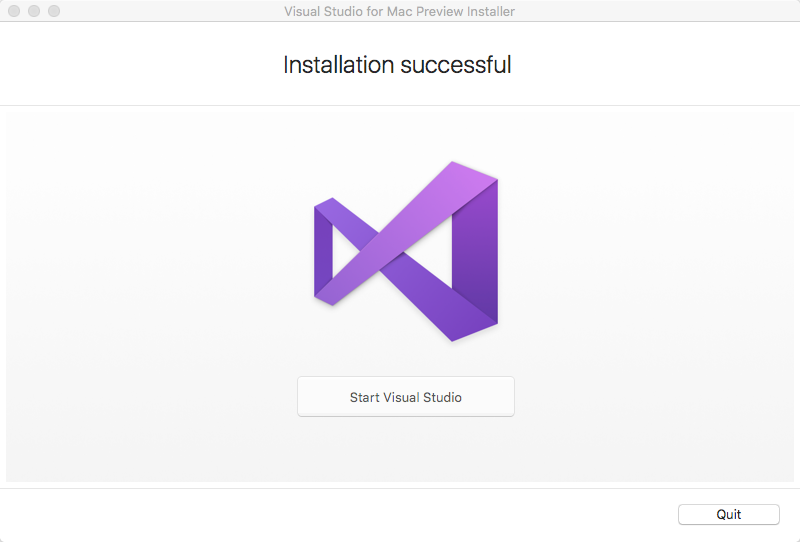
特に何もすることなく、ボタンをポチポチしているだけでインストールが終わりました。
楽でいいですねー。
インストールが終わったので、とりあえず新規でプロジェクト作成。
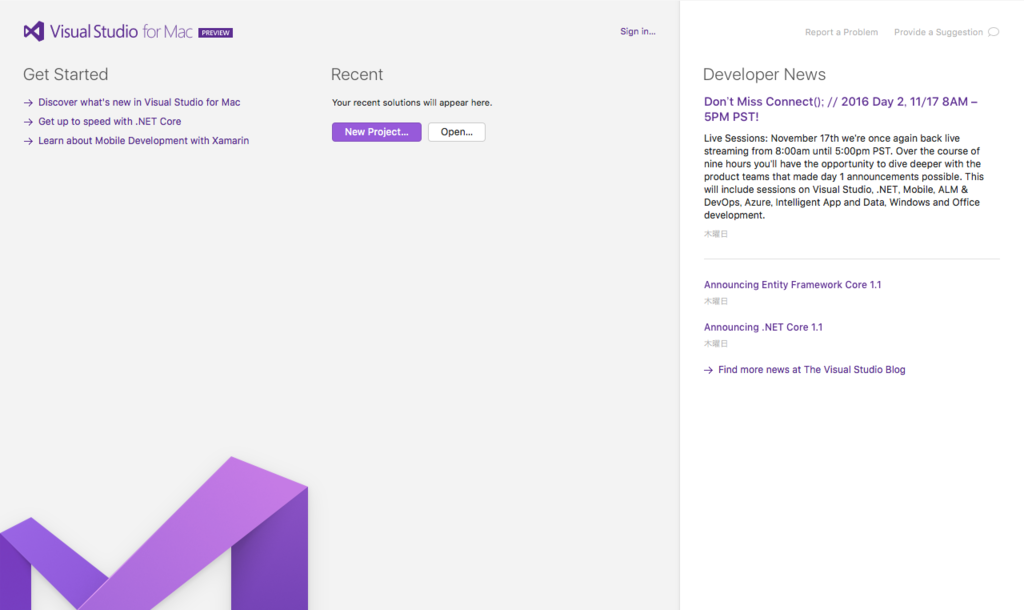
プロジェクトを作成したらまずは何も変更せずに実行!
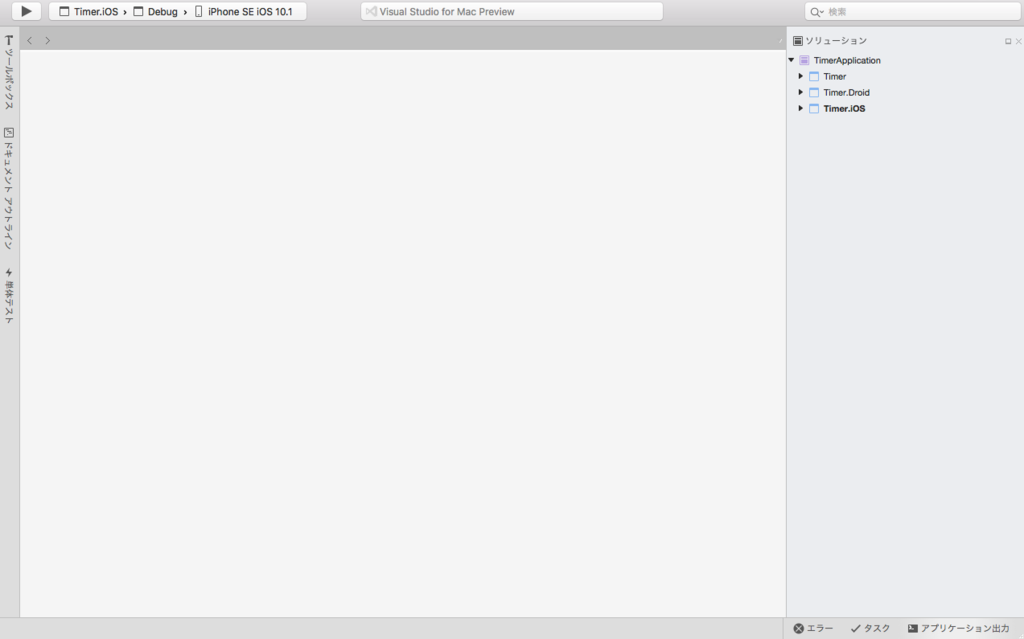
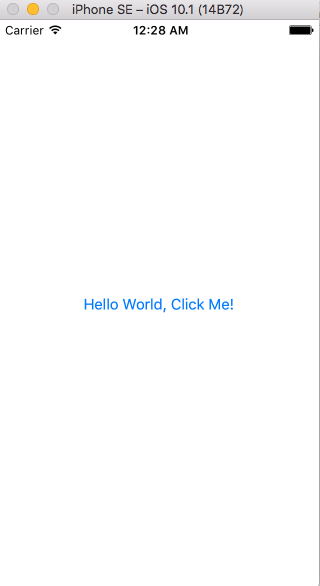
(おぉーちゃんと動いたー!笑)
デフォルトだとタップでカウントアップするようになっているようです。
ざっと触ってみたところ、Xamarin Studioの名前がVisual Studio for Macになったような感じです。
とりあえず近いうちにこれでアプリを作って記事を書いてみようと思います。
【Swift】よく使うextension集
extensionとは
既存のクラスに対し、メソッド、プロパティを追加することができる機能です。
Obj-Cで言うところのカテゴリと同じような機能で, 既存クラスで同じような処理を何箇所も行う場合は、extensionでまとめてしまうことで可読性や保守性が向上するかと思います。
UIApplication
extension UIApplication {

    /// 表示中のViewControllerを取得する
    ///
    /// - returns: UIViewController
    func currentViewController() -> UIViewController {
        var current: UIViewController
        var root = (self.windows.first?.rootViewController)! as UIViewController

        // モーダルビューが存在した場合はトップのものを取得
        while root.presentedViewController != nil {
            root = root.presentedViewController!
        }

        // rootがナビゲーションコントローラならば最後のViewControllerを取得
        if root.isKind(of: UINavigationController.classForCoder()) {
            current = (root as! UINavigationController).viewControllers.last!
        }
            // rootがタブバーコントローラならば選択中のViewControllerを取得
        else if root.isKind(of: UITabBarController.classForCoder()) {
            let selected = (root as! UITabBarController).selectedViewController

            // 選択中がナビゲーションコントローラならば最後のViewControllerを取得
            if (selected?.isKind(of: UINavigationController.classForCoder()))! {
                current = (selected as! UINavigationController).viewControllers.last!
            }
            else {
                current = selected!
            }
        }
        else {
            current = root
        }
        return current
    }
}

// 使い方
let current = UIApplication.shared.currentViewController()
UIView
extension UIView {
    /// subViewを全削除
    func removeAllSubViews() {
        self.subviews.forEach{
            $0.removeFromSuperview()
        }
    }

    /// キャプチャを取得
    ///
    /// - Returns: イメージ
    func capture() -> UIImage {

        // キャプチャする範囲を取得.
        let rect = self.bounds

        // ビットマップ画像のcontextを作成.
        UIGraphicsBeginImageContextWithOptions(rect.size, false, 0.0)
        let context: CGContext = UIGraphicsGetCurrentContext()!

        // 対象のview内の描画をcontextに複写する.
        self.layer.render(in: context)

        // 現在のcontextのビットマップをUIImageとして取得.
        let capturedImage : UIImage = UIGraphicsGetImageFromCurrentImageContext()!

        // contextを閉じる.
        UIGraphicsEndImageContext()

        return capturedImage
    }
}

// 使い方
self.view.removeAllSubViews()
let captureImage = self.view.capture()
UIImage
extension UIImage {

    /// 色とサイズを指定してイメージを生成します
    ///
    /// - parameter color: 色
    /// - parameter size:  サイズ
    ///
    /// - returns: イメージ
    class func generate(color: UIColor, _ size: CGSize = CGSize(width: 100, height: 100)) -> UIImage {
        let rect: CGRect = CGRect(origin: CGPoint.zero, size: size)

        UIGraphicsBeginImageContext(rect.size)
        let context: CGContext = UIGraphicsGetCurrentContext()!

        context.setFillColor(color.cgColor)
        context.fill(rect)

        let image: UIImage = UIGraphicsGetImageFromCurrentImageContext()!
        UIGraphicsEndImageContext()
        return image
    }
}

// 使い方
UIImage.generate(color: .red, CGSize(width: 150, height: 150))
String
extension String {
    /// MD5ハッシュ値を取得
    var md5: String! {
        let str = self.cString(using: String.Encoding(rawValue: String.Encoding.utf8.rawValue))
        let strLen = CC_LONG(self.lengthOfBytes(using: String.Encoding(rawValue: String.Encoding.utf8.rawValue)))
        let digestLen = Int(CC_MD5_DIGEST_LENGTH)
        let result = UnsafeMutablePointer<CUnsignedChar>.allocate(capacity: digestLen)

        CC_MD5(str!, strLen, result)

        let hash = NSMutableString()
        for i in 0..<digestLen {
            hash.appendFormat("%02x", result[i])
        }

        result.deallocate(capacity: digestLen)

        return String(format: hash as String)
    }
}

// 使い方
let md5Hash = "ABCDEFG".md5
UIFont
extension UIFont {
    class var hiragino: UIFont{
        return UIFont(name: "HiraKakuProN-W3", size: UIFont.preferredFont(forTextStyle: .body).pointSize)!
    }

    class var hiraginoBold: UIFont{
        return UIFont(name: "HiraKakuProN-W6", size: UIFont.preferredFont(forTextStyle: .body).pointSize)!
    }

    class var hiraginoMincho: UIFont{
        return UIFont(name: "Hiragino Mincho ProN W3", size: UIFont.preferredFont(forTextStyle: .body).pointSize)!
    }

    class var hiraginoMinchoBold: UIFont{
        return UIFont(name: "Hiragino Mincho ProN W6", size: UIFont.preferredFont(forTextStyle: .body).pointSize)!
    }
}

// 使い方
let hiraginoFont = UIFont.hiragino
let hiraginoBoldFont = UIFont.hiraginoBold
let hiraginoMinchoFont = UIFont.hiraginoMincho
let hiraginoMinchoBoldFont = UIFont. hiraginoMinchoBold
上記の他にも使っているものはたくさんあるのですが、自分で書いたものではなく、出典のわからないものなど多いので、以上になります。
自分用のextensionをまとめてライブラリ化し、新規プロジェクト作成時に追加するようにしておけば開発効率がどんどん上がっていくので、暇な時にオープンソースのものを探すのもよいかと思います。
【C#】Labelコントロールでテキストフォントのサイズを自動調節する
現在携わっているブロジェクトで実装した内容をメモ代わりに残そうと思います。
Excelでいうところの「縮小して全体を表示する」をWindowsFormのLabelコントロールで実装する要件が出てきた為、コントロールの矩形サイズから自動でフォントサイズを調節するユーザコントロールを作成しました。
WindowsFormのC#業務アプリはまだしばらく無くならないと思いますので、今後のプロジェクトの参考資料かな…。
namespace WindowsFormsApplication1
{
  partial class AutoFontSizeLabel
  {
    /// <summary>
    /// 必要なデザイナー変数です。
    /// </summary>
    private System.ComponentModel.IContainer components = null;

    /// <summary>
    /// 使用中のリソースをすべてクリーンアップします。
    /// </summary>
    /// <param name="disposing">マネージ リソースが破棄される場合 true、破棄されない場合は false です。</param>
    protected override void Dispose(bool disposing)
    {
        if (disposing && (components != null))
        {
            components.Dispose();
        }
        base.Dispose(disposing);
    }

    #region コンポーネント デザイナーで生成されたコード

    /// <summary>
    /// デザイナー サポートに必要なメソッドです。このメソッドの内容を
    /// コード エディターで変更しないでください。
    /// </summary>
    private void InitializeComponent()
    {
      this.SuspendLayout();
      this.ResumeLayout(false);
    }

    #endregion
  }
}
CalcFontSizeメソッドはMeasureStringメソッドを呼び出す際、引数の文字列が空文字の場合、SizeFが正しく計算されないため、空文字が引数で渡ってきた場合、初期値にそれぞれ0.1を設定しています。
using System;
using System.ComponentModel;
using System.Drawing;
using System.Windows.Forms;

namespace WindowsFormsApplication1
{
  public partial class AutoFontSizeLabel : Label
  {
    #region クラス変数
    /// <summary>
    /// フォントサイズを自動で算出するかのフラグ
    /// </summary>
    private bool mAutoFontSize = false;
    #endregion

    #region プロパティ
    /// <summary>
    /// フォントサイズを自動計算するかの値を取得または設定します。
    /// </summary>
    [Browsable(true)]
    [Category("表示")]
    [Description("フォントサイズを自動で計算するかの値を取得または設定します。")]
    public bool AutoFontSize
    {
      set
      {
        this.mAutoFontSize = value;
        Invalidate();
      }
      get
      {
        return this.mAutoFontSize;
      }
    }
    #endregion

    #region コンストラクタ
    /// <summary>
    /// クラスの新しいインスタンスを初期化します。
    /// </summary>
    public AutoFontSizeLabel()
    {
      InitializeComponent();
    }
    #endregion

    #region overrideメソッド
    /// <summary>
    /// 描画処理
    /// </summary>
    /// <param name="pevent"></param>
    protected override void OnPaint(PaintEventArgs pevent)
    {
      // 描画先のGraphicsオブジェクトを取得する
      var g = pevent.Graphics;

      // 描画に関連する値をコントロールのプロパティ等から取得する
      int height = this.Height;
      int width = this.Width;

      // 描画領域を指定する
      var rect = new Rectangle(0, 0, width, height);

      // 背景描画用のブラシを生成する
      using (backColorBrush = new SolidBrush(this.BackColor))
      {
        // 背景を描画する
        g.FillRectangle(backColorBrush, rect);
      }

      var size = new Size(width, height);
      var fontSize = CalcFontSize(this.Text, size, g);

      var font = this.Font;

      if (this.mAutoFontSize)
      {
        // 自動算出する場合、計算しておいたフォントサイズでフォントのインスタンスを再生成する
        font = new Font(this.Font.Name, fontSize);
      }

      // StringAlignmentからContentAlignmentへ変換する
      var stringFormat = new StringFormat();
      var num = (Int32)System.Math.Log((Double)this.TextAlign, 2);
      stringFormat.LineAlignment = (StringAlignment)(num / 4);
      stringFormat.Alignment = (StringAlignment)(num % 4);

      // 文字描画用のブラシを生成する
      using (var foreColorBrush = new SolidBrush(this.ForeColor))
      {
        // 文字を描画する
        g.DrawString(this.Text, font, foreColorBrush, rect, stringFormat);
      }
    }
    #endregion

    #region privateメソッド
    /// <summary>
    /// 引数で指定されたグラフィックオブジェクトに描画する最適なフォントサイズを算出します。
    /// </summary>
    /// <param name="str">出力する文字列</param>
    /// <param name="size">サイズ</param>
    /// <param name="g">グラフィックオブジェクト</param>
    /// <returns>フォントサイズ</returns>
    private float CalcFontSize(string str, Size size, Graphics g)
    {
      var s = new SizeF(0.1F, 0.1F);
      var a = 0.1F;
      var b = 0.1F;

      if (!string.IsNullOrEmpty(str))
      {
        s = g.MeasureString(str, new Font(this.Font.Name, this.Font.Size));
        a = (size.Width / s.Width);
        b = (size.Height / s.Height);
      }
      return (a < b) ? a : b;
    }
    #endregion
  }
}
DrawStringメソッドで文字を描画すると微妙に右にずれます。掲示板などで色々議論されていますが、今回未対応です。以下のサイトが参考になるかと思います。
VB.netで文字を正確な位置に描く。
【Xamarin】落ちないアプリの作成【Android】
Xamarinが無料になってから、色々なところでかなり盛り上がっているように感じます。
そんな私も最近Xamarin勉強中です笑
今回は、Xamarinについて調べているうちに、面白い内容を見つけたので、試すついでに記事にしてみました。
はじめに
タイトルになっている落ちないアプリ。
そんなものはありません!!
だけど、開発者としては落ちないアプリを作っていきたいですよね?
どうやって作るのか
上で書いたように絶対に落ちないアプリを作るというのは現状不可能です。
- 多種多様な端末、バージョン
- メモリ不足
- バグ
etc...
そこで、例外をキャッチして、とりあえず落ちないようにしてしまおうという考えです。
例外ハンドラ
androidで例外ハンドラといえばUnhandledExceptionですよね。
AppDomain.CurrentDomain.UnhandledException += (s, e) => {};
UnhandledExceptionを使用すれば例外をキャッチできますが、補足することができないためアプリが終了してしまいます。
ならどうするのか、、、
以下の処理を使えばアプリを終了させないようにできるそうです!
AndroidEnvironment.UnhandledExceptionRaiser += (s, e) => {
    e.Handled = true;
};
(Handledをtrueにすることで強制的に補足済みの例外にしています)
実際のコードは以下になります。
protected override void OnCreate(Bundle savedInstanceState) {
    base.OnCreate(savedInstanceState);
    SetContentView(Resource.Layout.Main);
    AndroidEnvironment.UnhandledExceptionRaiser += (s, e) => {
        e.Handled = true;
    };
}
サンプル
実際に以下のように組み込んでみました。
(今回はボタンクリックでExceptionを発生させ、UnhandledExceptionRaiser内でトーストを表示させています)
protected override void OnCreate(Bundle savedInstanceState) {
    base.OnCreate(savedInstanceState);
    SetContentView(Resource.Layout.Main);

    Button button = FindViewById<Button>(Resource.Id.myButton);
    button.Click += delegate {
        throw new Exception("EXCEPTION");
    };

    AndroidEnvironment.UnhandledExceptionRaiser += (s, e) => {
        Toast.MakeText(this, "例外発生!!", ToastLength.Short).Show();
        e.Handled = true;
    };
}
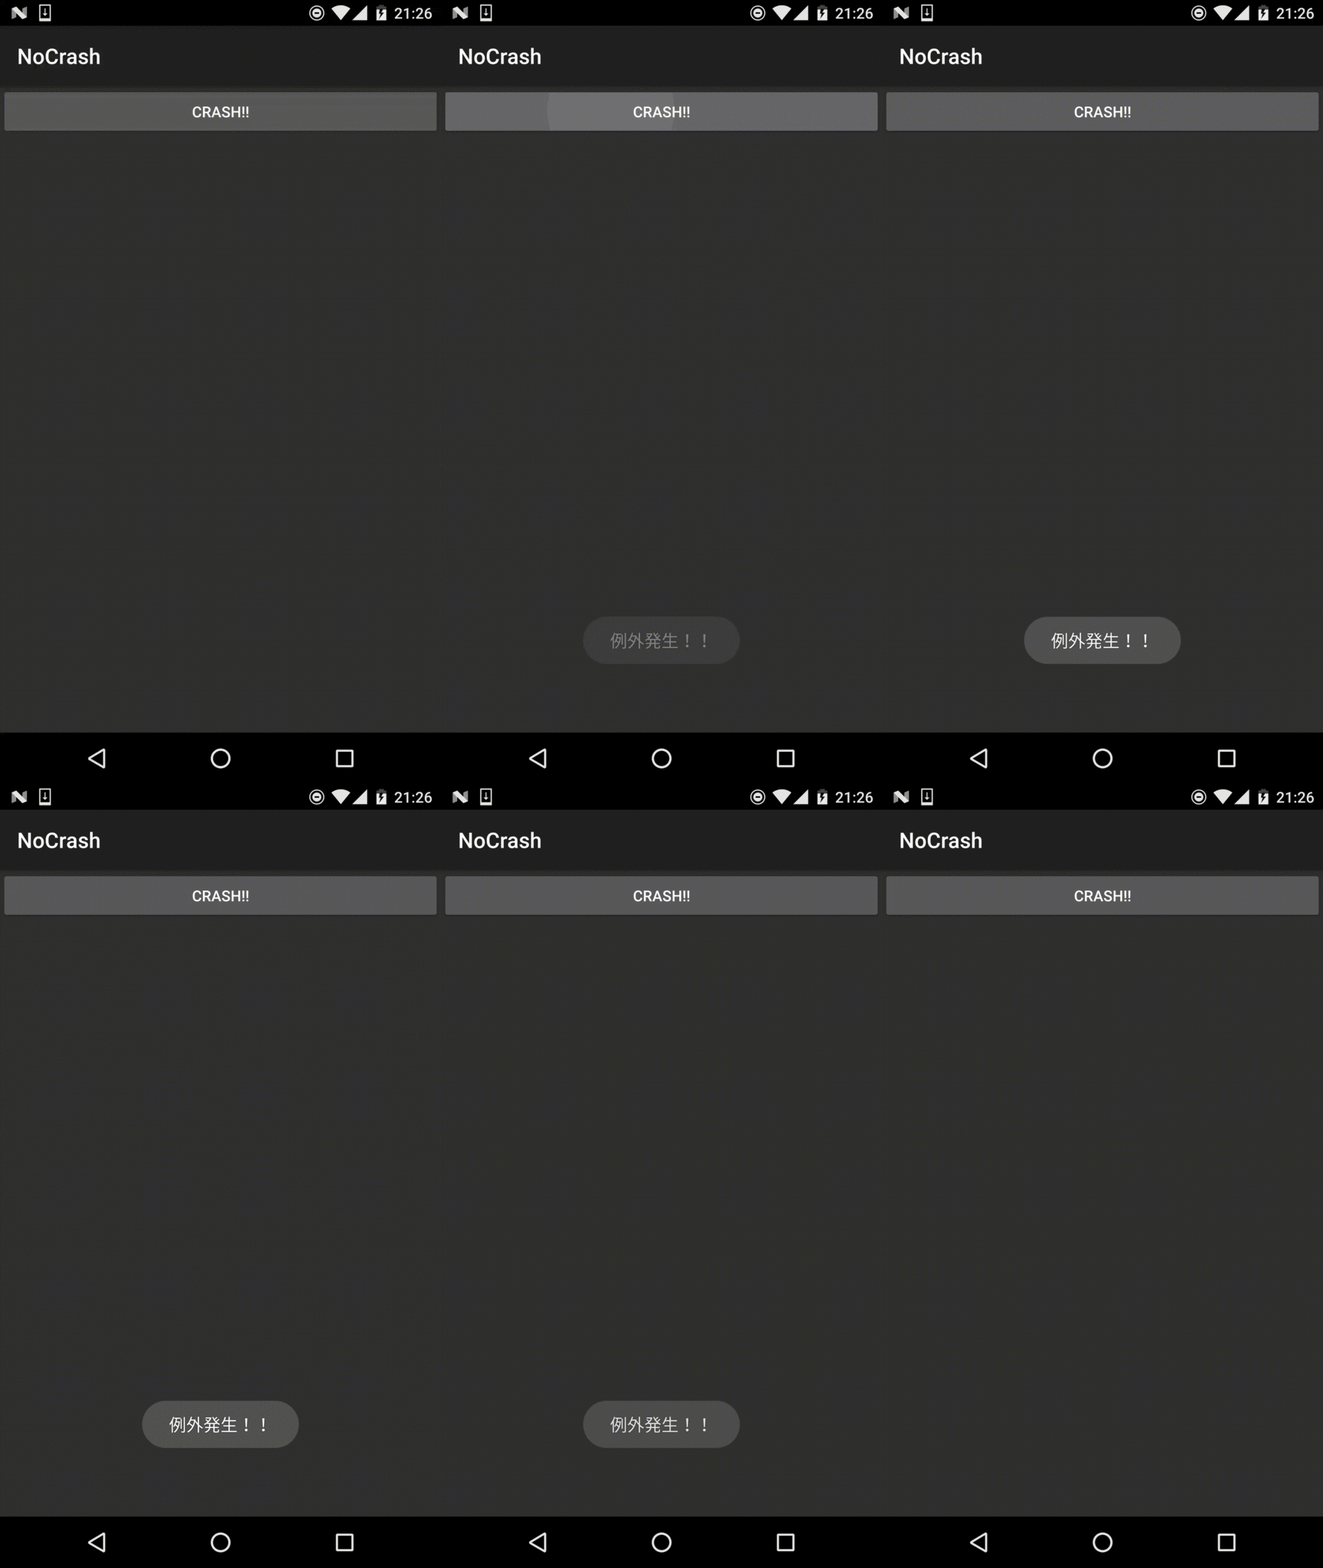
とりあえず落ちないアプリ?の作成はできました笑
これは使い方次第でありかも?